This guide walks you step-by-step through the tasks you need to create an accessible blog post in WordPress.
As a first step, when I create a new blog post, I start by giving the article a title – I hope you do the same!
An accessible title for your blog post
In WordPress, the title of your article automatically becomes the page title as well. This means that if your blog is called “Creating Accessible Blog Posts with WordPress,” then the page title will be the same.
The page title refers to the text you see at the top of your browser tab. Here’s an image of our homepage to illustrate this. Our homepage is titled “Digital accessibility experts”

This title must exist so that screen reader users can navigate their tabs more easily.
Best practice is to include the name of the individual page and the full website name in a page title. For example, ours would look like this: “Creating Accessible Blog Posts with WordPress | Brain-Friendly Digital “. That would be the complete page title.

You can easily set the title for your entire website in WordPress:
- Go to Settings in WordPress.
- Then go to General
- Fill in the first field, which is called “Website Title”.
Accessible handling of paragraphs
After you’ve set the title, you’ll probably start by writing an introductory paragraph for your article. This text should be a paragraph.
In WordPress, the symbol for this looks like this:

Whenever you create a new paragraph in your Gutenberg editor, it’s a paragraph from the start. So, thankfully, you can’t really go wrong!
The only mistake you can make here is using hard line breaks. If you use the key combination SHIFT + ENTER to create “gaps” between your paragraphs, this results in a forced blank line, which a screen reader will then read aloud.
What a paragraph actually does is automatically enclose your text with a so-called `<p>` tag in the HTML structure. Every new paragraph needs this kind of enclosing. So, if you want to start a new paragraph, you have to make sure it has its own `<p>` tag. This happens automatically when you press ENTER, but not if you create a hard line break.
Correctly format text in paragraphs.
If you’re like me, you sometimes want to emphasize certain words or phrases in your paragraphs. Usually, you do this by making the text bold or italic. Luckily, you can do this very easily in WordPress by selecting the words or phrases and then clicking the B or I symbol. WordPress usually does everything correctly in the background, and there’s nothing more you need to know!
Just for the sake of completeness, I want to tell you that bold text must be enclosed in a <strong> element and italic text in an <em> element. These are the only permissible formatting options. Why am I telling you this? Because there are also <b> elements, for example, which you could use to make text bold. However, these were used incorrectly on television, so they were renamed “Bohmas Bottschalk tags” and canceled, and therefore may no longer be used!
Here’s a visual example of what I just described in the WordPress editor and in HTML. (As you can see, you can also view the HTML in the WordPress editor.)
<p>Here's another visual example of how that works. <em> just described</em> in the WordPress editor and <strong> This is what it looks like. (As you can see, you can also view the HTML in the WordPress editor.)</p>
Everything you need to know about creating accessible content!
- What types of content actually need to be accessible: social media, websites, newsletters?
- What requirements apply to content, and how do you implement them—without missing anything?
- How do you integrate accessibility into your daily workflow without it becoming a major extra burden?
Through theory and practice, we’ll show you what we’ve taught participants—from Aktion Mensch to Deutsche Bahn—over the past three years!

Links in your texts:
You’re probably really keen to include links in your texts. That’s perfectly fine. Theree are just two things you should keep in mind:
- The labels for your links
- The position of your links
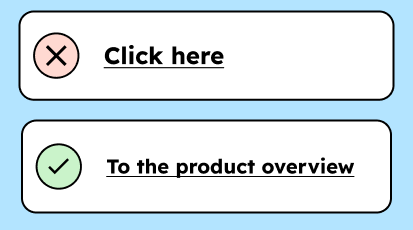
Regarding point 1: Your links should be “speaking links.” This means they tell users what their purpose is or where they lead. So, your link shouldn’t be called “Learn more,” but should provide more context and be worded something like “Learn more about the workshop on digital accessibility.”
Why is this important? Screen reader users, among other things, can easily display a summary of all links to navigate. This is obviously problematic if all your links are simply titled “learn more “ .
Regarding point 2: If possible, please don’t insert your links in the middle of paragraphs. Links within paragraphs cause screen readers to stop. Users then have to navigate further to skip the link and then again to continue reading the text. It’s not a bug, but it’s annoying. Therefore, please try to place the link(s) at the end of a paragraph.
Are you using a different language in your paragraphs?
Sometimes, a paragraph in a text is written in a different language from the rest of the text. This paragraph must then be marked with a so-called “lang” attribute. This is important because screen readers always read the text aloud in the language specified by the website. If your website’s base language is German, the screen reader will read all text in German, even if the words aren’t German. To be read aloud in the correct language, texts in other languages must also be marked up in their respective languages.
To properly mark up texts in other languages in WordPress, you only need to:
- Hover over the text with the mouse
- In the menu that appears, select the downward arrow (“More”).
- Then select the “language”.
- Finding the right language
After you do that, WordPress will automatically add the correct lang attribute to your paragraph.
Adhere to the necessary heading structure.
After you’ve had your fill of writing your first paragraphs, hopefully you’ll want to use a subheading to better structure the text.
When it comes to headings, it’s important to use the correct heading structure. This is not only essential for digital accessibility, but also for search engines like Google to like you!
If you want to make a paragraph a heading, then:
- Do you write a text first?
- Hover your mouse over the text.
- Click on the paragraph symbol.
- Select “Heading” from the list that appears.
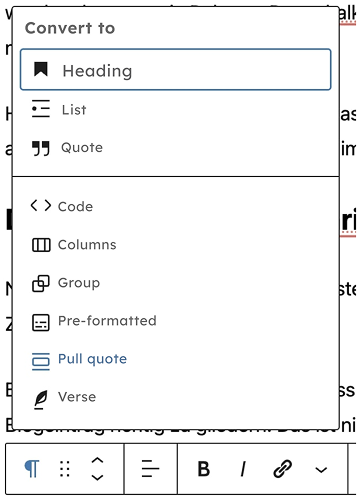
Your text should now be a heading. If you hover your mouse over the heading, you’ll see “H2” somewhere in the menu that appears. This means you’ve selected heading level 2. Whenever you select a heading, WordPress automatically turns it into an H2. WordPress doesn’t use an H1 because only one H1 is allowed per article, and that’s also the article’s title.
In theory, each of your headings can be an H2. However, if you’re writing a blog post that summarizes several topics under one heading, the headings should be H3.
Let’s say we write an article about how to bake delicious cookies for Tobi and Nina and send them by post to make them happy.
A heading structure could therefore look like this:
- An H2 titled: “Bake delicious cookies for Tobi & Nina.”
- This is followed by an H3 that introduces a new section entitled “Go shopping.”
- This is followed by an H3 that introduces a new section entitled “Baking.”
- Then the topic is over, and a new H2 comes along, called “Sending cookies.”
- and so forth
Maintaining the correct heading structure is particularly important for keyboard navigation. This allows keyboard users to navigate articles more easily and jump to the content that interests them.
PS: Obviously, this blog was written around Christmas time.
Using images in an accessible way in WordPress
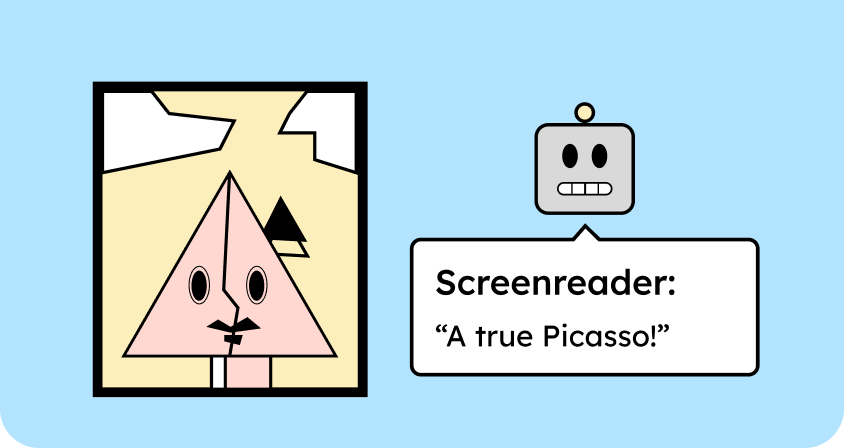
Every image on your blog that conveys content needs alternative text. This can be, for example, alternative text that you assign to your image. To do this, drag the image into your blog and select it. Then, on the right-hand side, under “Alternative text,” you can enter the alt text.
According to the official WCAG guidelines, this doesn’t have to be an alternative text in the image’s alt attribute. WCAG only states that there must be a text alternative for an image. This also means that it’s sufficient to explain an image with text next to or below it. The image must be explained, but not necessarily in the image’s alt attribute.
If you decide to write the text below or next to your image, it’s still a nice touch to include alternative text. This can be very short and summarize the essentials in just a few words.
Use of lists
Are you using a bulleted list in your article? Then you should mark it as a list. It’s just as easy as with headings. Simply hover your mouse over the text, click the paragraph symbol, and select “List”.
The only thing you need to pay attention to with lists is that you clearly distinguish between ordered and unordered lists. Ordered lists consist of elements that follow a logical sequence and are therefore numbered one, two, three, and so on. With unordered lists, the order of the elements doesn’t really matter. These usually start with a dash or bullet point.
Accessibility of tables
You can create accessible tables with WordPress – up to a certain point. Tables are very tricky and have long caused problems in digital accessibility; they should be avoided whenever possible.
If you still want to use them: You can create tables in WordPress by simply pressing Enter in Gutenberg to create a new “block”. Then click the plus symbol and select a table.
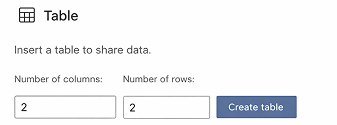
Here’s a picture of it:

Now you need to decide how many columns and rows your table should have:
Finally, to make your table at least accessible, you should add a header. To do this, click the table, then toggle the “Header” option in the menu on the right.
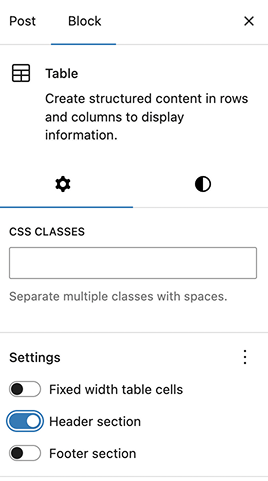
A header is important because the screen reader repeatedly reads the mapping of table headers to table rows. Hence, users always know exactly where they are and can correctly link the information to it.
How do I test whether my blog post is accessible?
After you’ve written your article, it’s important to test it. The best way to do this is with a screen reader. If you’re using an iMac or MacBook, it’s very easy. Simply press the Command (CMD) key + F5, and you’re good to go: the screen reader will turn on! (You can turn it off again with the same key combination, so don’t worry!)
Now you can navigate your website using the arrow keys and the tab key, and listen to what and how the screen reader reads it aloud. If you’ve never heard this before, it might be a little startling! To get a feel for it, you can also watch this video. Here, I give a demonstration with Nina Schweppe. [Link to video: How blind people use a website]
To do the same on a Windows device, you’ll need to download the free screen reader from NVDA or the paid one from JAWS. JAWS naturally offers the best quality because more money is invested in it.
Here’s the link to the NVDA screen reader.
Here’s the link to the JAWS screen reader.
Conclusion: Accessible blog posts with WordPress
I hope this guide answered all your questions about creating accessible blog posts with WordPress. If you’d like to learn more about WordPress and accessibility, check out our blog post about accessible plugins for WordPress: [Link to article about accessible plugins].
If you want to learn more about creating accessible content, check out our workshop. [Link to workshop for content creators]
